Which motorcycle amplifier wiring kit will connect your system without leaving essential parts missing? The answer depends on your motorcycle’s fitment, the amplifier’s current requirements, and how the factory radio delivers its signal. The best motorcycle amplifier wiring kits address those requirements together. A mounting bracket or integration adapter alone is not a complete kit—and a large advertised wattage rating tells you little about compatibility.
Top Motorcycle Amp Wiring Kits
Rockford Fosgate RFK-HD14M5

- The RFK-HD14M5 is an Amplifier Installation Kit, designed for use with...
- The plug-and-play amp install kit includes a heatsink, bracket, hardware...
- T-harness integration allows for complete electrical integration without...
The Rockford Fosgate RFK-HD14M5 is a system-specific installation candidate, not a universal Harley wiring kit. Its stated application covers select 2014–2023 Road Glide, Street Glide, Ultra, and CVO motorcycles, subject to the manufacturer’s detailed compatibility requirements.
The manufacturer material identifies this Gen-3 installation package alongside the M5-800X4 amplifier. That relationship makes it especially relevant to riders building around that amplifier rather than adapting an unrelated unit.
Its principal advantage is coordinated system design. A matching package can address amplifier connections and motorcycle installation requirements together, reducing the uncertainty of assembling unrelated power cables, signal adapters, and speaker harnesses. That makes it a premium-style integration route rather than simply a purchase of heavier wire.
However, the supplied information does not establish the kit’s complete parts inventory, power-wire conductor material, cable lengths, or included fuse. Do not transfer specifications from the amplifier page to the wiring kit: an amplifier’s recommended fuse is not proof that the same fuse is supplied in the installation package.
Confirm the required amplifier, compatible speaker connections, mounting provisions, and any additional rear-speaker harnesses. Also establish whether radio configuration or programming is necessary for the exact motorcycle.
Factory-audio exclusions require particular attention. The broad model list does not confirm support for every Boom! Audio configuration, factory-installed amplifier, or factory Rockford Fosgate system. Likewise, the 2023 end date does not automatically include every redesigned or midyear motorcycle.
Verdict: The strongest candidate here for a deliberately matched M5-800X4 installation, but only after the current fitment guide confirms the motorcycle and its existing audio equipment.
Stinger SVTK4681

The Stinger SVTK4681 is a candidate for riders planning a two- or four-channel amplifier installation on a Harley-Davidson Touring motorcycle. Its appeal is the motorcycle-oriented package: a suitable harness can reduce the cutting, terminating, and cable management involved in adapting a general-purpose automotive kit.
The available listing information identifies it as a 2/4-channel motorcycle amplifier wiring kit and associates it with 1998-and-newer Harley-Davidson applications. However, that broad description does not establish compatibility with every Touring model, radio, or factory amplifier introduced since 1998.
Important specifications remain unconfirmed: exact supported models, power-wire conductor material and gauge, individual cable lengths, fuse rating, and the complete connection inventory. Do not assume specifications from another Stinger kit apply to this model.
For a two-channel installation, establish whether the package supplies the necessary input and speaker-output connections without unwanted adapters. For a four-channel installation, confirm whether it provides four independent signal paths or expects the amplifier to distribute a two-channel input internally. Those arrangements are not interchangeable in every system.
Its potential advantage is installation convenience, particularly where motorcycle-length wiring avoids excessive cable inside the fairing. Its limitation is the information needed to establish that convenience for your particular bike. Channel count alone does not prove factory-radio integration, remote turn-on compatibility, or factory-amplifier bypass capability.
Compare the standalone kit with any amplifier-and-wiring bundle carefully. The amplifier included in a bundle does not establish the contents of the wiring kit sold separately.
Verdict: A useful candidate for a conventional two- or four-channel Harley installation, provided the seller supplies a model-specific contents list and confirms fitment before purchase.
Cerwin-Vega CMHR2
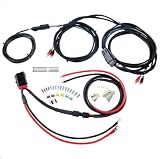
- Enhanced Connectivity: This Cerwin Vega kit includes 8 gauge OFC power and...
- Superior Audio Quality: Featuring quality twisted OFC RCAs with quick...
- Comprehensive Kit Design: Comes with a complete speaker terminal...
The Cerwin-Vega CMHR2 is positioned as a two-channel Harley-Davidson amplifier installation kit. It belongs on the shortlist for riders adding amplification to a front speaker pair rather than building a larger, independently controlled four-channel system.
The supplied product description identifies the CMHR2 as a 1998-and-newer Harley-Davidson two-channel installation package. That establishes its advertised purpose, but not an unrestricted model-year range. “1998+” should not be interpreted as confirmation that it supports current motorcycles or every factory-audio configuration.
Before buying, obtain confirmation of the power and ground cables, signal connections, speaker-output wiring, remote turn-on provision, fuse holder, and fuse. Conductor material, cable lengths, fuse specification, and the precise connector inventory are not confirmed in the available information.
The important integration question is what connects the factory radio to the amplifier. A two-channel wiring package might carry audio between components without correcting factory equalization, bypassing an existing amplifier, or converting a digital audio signal. Those functions require explicit documentation.
Its advantage is its focused application. When the motorcycle and amplifier match the harness, a two-channel package can avoid paying for—or finding space for—unnecessary rear-channel wiring. Its limitation is expansion: adding rear speakers later may require additional signal and speaker harnesses.
Also establish what is excluded. Do not assume the amplifier, speakers, mounting hardware, radio interface, or programming service is included simply because the product is called an installation kit. These omissions can change the overall cost substantially.
Verdict: Investigate the CMHR2 for a straightforward front-speaker amplifier installation, but require written confirmation of factory-audio compatibility and package contents.
Cerwin-Vega CMHR4

- Harley Davidson Specific 4-Ch Audio Wiring Kit (All Harley Baggers...
- 8 Gauge OFC Power and Ground Battery Connections, Waterproof fuse holder...
- Heavy duty power quick disconnects, Quality twisted OFC RCAs with quick...
The Cerwin-Vega CMHR4 targets four-channel Harley-Davidson amplifier installations. It is the more relevant candidate when the system needs separate front and rear speaker circuits, including configurations with saddlebag speakers.
The advertised application is 1998-and-newer Harley-Davidson motorcycles, and the supplied description identifies four-channel RCA signal wiring intended for saddlebag-speaker installations. Exact supported motorcycles, individual cable lengths, power-wire specifications, fuse rating, and the complete speaker-connection inventory remain unconfirmed.
Four-channel wiring deserves closer inspection than the name suggests. Verify whether the package supplies four independent RCA channels, how the speaker outputs terminate, and whether rear wiring reaches the intended speaker locations. An RCA connection carries an input signal; it does not replace the amplified speaker wiring running back from the amplifier.
The meaningful advantage is organized signal routing for a larger system. A correctly matched package can make front/rear connections easier to identify and service, especially when rear speakers introduce longer cable runs and additional disconnect points.
Its limitation is amplifier compatibility. Four-channel amplifiers may use conventional terminals, proprietary plugs, high-level inputs, or different RCA arrangements. Having four channels does not guarantee that the CMHR4 connects directly to a particular amplifier.
Ask specifically about saddlebag removal, too. If the speakers move with the bags, suitable disconnects and protected connector locations matter as much as cable reach. Do not assume a rear-channel package includes every bag-side connector or weather seal.
Finally, verify whether the installation retains, bypasses, or replaces the existing factory amplifier. Each route can require different integration hardware.
Verdict: A candidate for front-and-rear Harley audio systems when its documented signal and speaker connections match the complete installation—not merely the amplifier’s channel count.
Choosing the Right Motorcycle Amplifier Wiring Kit
Motorcycle and Factory-Audio Fitment
Record the motorcycle’s year, model, trim, factory radio, existing amplifier, and connector types. A motorcycle audio wiring kit for Street Glide applications is not automatically suitable for every Street Glide generation.
Broad year ranges can conceal changes to radios, connectors, and amplifier locations. Newer A2B audio integration requires system-specific checks; conventional analog harnesses cannot simply substitute for a compatible digital interface.
For Indian and Victory motorcycles, require explicit compatibility documentation rather than relying on a universal-fit headline.
Power-Wire Gauge and Current Requirements
Select wire using the amplifier manufacturer’s requirements, expected input current, conductor material, cable length, routing, and connection ratings.
Speaker-output wattage is not the same as electrical input demand: amplifier efficiency and operating voltage affect current consumption. Longer cable runs also increase resistance and voltage drop.
American Wire Gauge, or AWG, identifies conductor size. An installation requiring 8 AWG power and ground wiring still needs suitable cable construction and protection; “8-gauge” is not a universal wattage guarantee.
OFC and CCA Conductors
OFC means oxygen-free copper. CCA means copper-clad aluminum: an aluminum conductor with an outer copper layer.
At the same actual conductor size and length, CCA has higher resistance than copper, producing more voltage drop and heat at the same current. Documented OFC is generally the more straightforward choice where space limits cable size.
Avoid unsupported gauge-equivalence shortcuts. Check actual conductor specifications, not insulation thickness or an unexplained wattage label.
Fuse Protection
The battery-side fuse primarily protects the power cable against excessive current, including a short circuit.
Follow manufacturer instructions for fuse placement and select protection appropriate to the wiring, connections, and installation. An included fuse is not automatically correct for every configuration.
Never install a larger fuse simply to stop repeated blowing. Find the cause, which may involve a fault, unsuitable wiring, or an incorrect protection arrangement.
Kit Contents and Missing Components
Check for:
- Power and ground cables.
- Fuse holder, fuse, and battery terminals.
- Signal wiring and speaker wiring.
- Remote turn-on connection, where required.
- Protective loom, mounting supplies, and disconnects.
A power-wiring kit supplies electrical power. A signal-integration harness connects audio equipment. A complete model-specific installation package should identify how both needs are addressed.
Remote turn-on wiring, RCA cables, digital interfaces, and disconnects depend on the installation. “Plug-and-play” does not guarantee every required component is included.
Motorcycle Wiring Installation Checklist
Use this as a planning checklist, not a replacement for motorcycle-specific instructions:
1. Isolate the battery correctly. Follow motorcycle and amplifier instructions, including any procedures affecting security systems or stored settings.
2. Confirm the grounding arrangement. Use the approved return path; do not assume any convenient frame bolt is acceptable.
3. Protect cable routing. Avoid exhaust heat, sharp edges, steering movement, suspension travel, and pinch points. Protect penetrations with appropriate grommets.
4. Secure connections. Provide strain relief and suitable protection against moisture and vibration. Keep service disconnects accessible without leaving them unsupported.
5. Check before reassembly. Verify polarity and continuity with power isolated, then check operating voltage and system function using the prescribed procedure.
Use a qualified installer when electrical requirements, factory integration, or programming needs are unclear.
FAQ
What gauge wire do I need for a motorcycle amplifier?
Use the amplifier manufacturer’s specified wire size, adjusted where necessary for cable length, conductor material, routing, and installation conditions. Electrical input current—not advertised speaker-output wattage—determines the demand on the cable. Confirm that terminals, disconnects, and fuse protection also suit the selected wiring.
Is OFC better than CCA for motorcycle amplifier wiring?
OFC has lower resistance than CCA at the same actual conductor size and length. That helps reduce voltage drop and heating at a given current. However, material alone does not establish suitability: conductor size, insulation, cable length, termination quality, and installation requirements still need to be checked.
Will a universal amplifier wiring kit work on my motorcycle?
A universal kit may provide suitable power wiring, but it does not establish factory-radio compatibility or supply motorcycle-specific connectors. Check cable lengths, environmental protection, signal integration, speaker connections, and grounding requirements separately. Additional harnesses or interfaces may be necessary even when the power cables are suitable.
Does a plug-and-play wiring kit include factory-radio integration?
Not necessarily. “Plug-and-play” may describe only the connection between a harness and an amplifier. Confirm whether the package handles the factory radio’s signal format, existing amplifier, turn-on behavior, and speaker routing. Digital audio systems may need a separate compatible interface and configuration.
Can I use the fuse included with my amplifier wiring kit?
Only after confirming that its rating and type match the cable, connections, amplifier instructions, and installation layout. The battery-side fuse protects the power wiring, so its suitability cannot be judged from amplifier wattage alone. Never increase the rating merely because the supplied fuse repeatedly blows.
Conclusion
A reliable motorcycle amplifier installation starts with compatible connections, documented conductors, appropriate fuse protection, and secure routing. Choose the wiring package around the motorcycle’s actual audio system and the amplifier’s electrical requirements. Resolving missing harnesses and integration questions before installation is far more valuable than buying by channel count or advertised wattage alone.